
On this page:
About pedestrian and bicycle crossings
Pedestrian and bicycle crossings provide points to safely and conveniently cross roads and streets, or other barriers such as motorways, railway lines or waterways. Many crossings are located on paths to activity centres and schools, or at stations, bus or tram stops.
Crossings are either at–grade or grade–separated.
At–grade crossings may have:
- road markings and surface treatments
- traffic signals and signs
- barrier gates.
Grade–separated crossings include:
- pedestrian bridges
- overpasses
- subway underpasses
- stairs
- lifts.
Why is it important?
Pedestrian and bicycle crossings are critical for safe, easy movement around cities and towns.
Crossings concentrate pedestrian and cyclist movement to specific locations where they can safely cross the road or barrier.
Where crossings are poorly located, say away from movement desire-lines, or with interrupted sightlines to the approaches or crossing, it may be perceived as an inconvenience or safety risk, and not be used.
2.4.1: maximise pedestrian and cyclist safety and security at crossings
- Locate pedestrian and bicycle crossings on direct, desirable routes to destinations such as schools, parks, activity centres and public transport stops, or that link neighbourhoods.
Tip: people often seek a direct route to their destination, even where this involves dangerous informal crossings of busy roads or railway lines.
- Co-locate pedestrian crossings and bicycle crossings, but provide each mode with a separate crossing path.
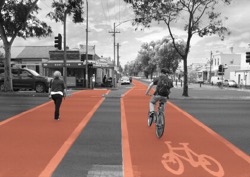
Tip: road crossing points can become congested with waiting and crossing pedestrians and cyclists. Separating the waiting and crossing traffic is a safer practice. - Incorporate lighting on approaches to and at pedestrian and bicycle crossings.
- Clearly signpost upcoming crossings and intersections to alert pedestrians, cyclists and drivers.
- Maintain clear sightlines on the approach to and at pedestrian and bicycle crossings.
2.4.2: ensure convenient and safe at–grade crossings for pedestrians and cyclists
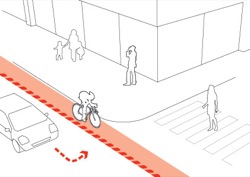
- Locate at–grade crossings on roads where pedestrians and cyclists can be seen by approaching drivers.
Tip: drivers must be able to see waiting or crossing pedestrians and cyclists. Crossings should not be located on road curves or hill crests that reduce sightlines to the crossing.
- Where both pedestrian or bicycle traffic and vehicle traffic levels are high, provide formal controlled road crossings.
- Provide a clear space for pedestrians waiting to cross a road, separate from the through pedestrian path.
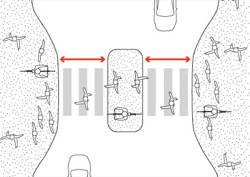
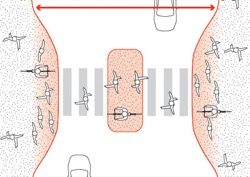
- Provide pedestrians and cyclists with the shortest practical road crossing distance.
- Where roadways are wide, install pedestrian and cyclist refuges such as kerb outstands, traffic islands, and median strips.
Tip: kerb outstands and mid-street refuges can shorten the pedestrian crossing distance and allow a staged crossing. - Provide pedestrian refuges of sufficient area, width and length to accommodate the projected numbers of waiting pedestrians and cyclists.
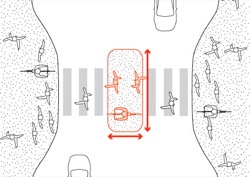
Tip: cyclists require refuge space for bicycles of up to 1.8m length, and larger for tandem and child buggy attachments. - Where kerb outstands, traffic islands, or median strips are used at crossings, keep the path clear of obstructions.
- Position crossing request buttons for ease of use by both pedestrians and cyclists.
- Where pedestrian paths or bicycle lanes cross a left turning vehicle path, provide road pavement detail to alert drivers.
Tip: a road pavement detail may be a rumble strip, a coloured road surface, or a raised road section.
2.4.3: ensure convenient and safe grade–separated crossings for pedestrians and cyclists
Grade–separated crossings, while safer than at–grade crossings, can involve longer travel distances and crossing times so that pedestrians and cyclists might choose not to use them, and to cross barriers informally at risk to themselves and others.
- Locate grade–separated crossings of rail lines, motorways or waterways on direct, desirable routes to schools, parks, activity centres and public transport stops.
Tip: grade–separated crossings are most suitable where the topography minimises the length of ramps required.
- Locate grade–separated crossings adjacent to active uses that can provide opportunities for informal surveillance of the approach path and the crossing.
Tip: an active use may be a busy public space, or a building with people coming and going and with overlooking windows.
- Provide grade–separated crossings with wide straight paths, clear sightlines and adequate lighting.
Tip: paths that are narrow or with few ‘escape route’ options, such as bridges, underpasses, stairways, lifts and walk- throughs, can feel unsafe and can increase opportunities for entrapment.
- Construct grade–separated crossings with a width greater than 3m, with a minimum of 2500mm between handrails, an unobstructed height no less than 2500mm, exit splays of 45 degrees, and clear sightlines for 15m.
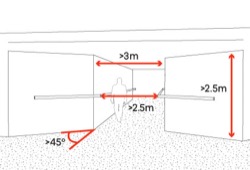
Tip: refer to Austroads guidance. - Continue the approach path width for the full length of the underpass or bridge.
2.4.4: manage pedestrian and bicycle crossings to respond to local conditions
- Monitor pedestrian and cyclist numbers and safety at pedestrian and bicycle crossings to inform management and improvements.
Tip: management can include adjusting traffic light controls to respond promptly to the presence of pedestrians.
- Consult with users when locating pedestrian and bicycle crossings.
Tip: local communities have detailed knowledge of user behaviour, needs and preferences regarding crossing types and locations.
Page last updated: 28/10/25